 |
||||||||||||||||
|
Home • Tours • Photo Workshops • Photo Tips • Events • About Susie • Contact
PHOTO TIPS by Susie Reed PHOTO TOURS PHOTOGRAPHY WORKSHOPS  ~~~~ |
||||||||||||||||
|
PHOTO TIP: WAYS TO LEARN PHOTOGRAPHY
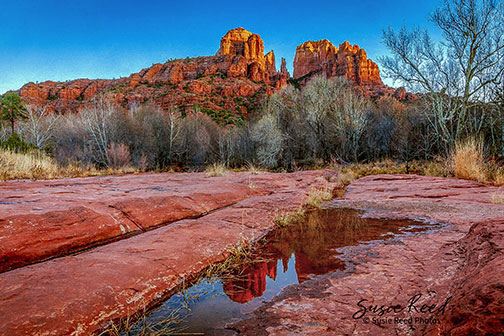 "Sunset After Rain" • Cathedral Rock • Sedona, AZ • Photograph by Susie Reed |
||||||||||||||||
| Sometimes my students tell me they think they need to learn everything their camera and photo software does, which is an overwhelming proposition. They're always relieved when I tell them that’s not necessary. A more reasonable and manageable approach to learning photography is to start with the basics of shooting and editing and build your skills from there. To be a good photographer you need to know how to do both. They’re like two sides of a coin that when done well together create successful photos. |
||||||||||||||||
 |
||||||||||||||||
|
How you approach learning photography is important. Try not to make it more complicated than it needs to be or let the fear of trying something new deter you. Instead of thinking about everything you think you “should” know, which can take the fun out of what you’re doing, narrow your focus to each new thing you’re learning, then next and next and so on. Eventually you’ll develop skills that will take you far.
Learning photography takes time and patience. Your progress will become apparent in your improved photos and the sense of satisfaction, accomplishment and ease you feel as you get better. What once may have seemed too difficult if not impossible for to you to do can become second nature if you keep at it. There are many ways to learn photography. You can attend workshops, take online classes, join a camera club, read manuals, find instructional videos, tutorials, blogs and more online. Hanging out with other photographers and sharing what you know is another way to broaden your skills. I’ve learned good tips, new ways to use my camera and apps from other photographers who’ve shown me things I've never tried. You may not always know how what you're learning will benefit you. Nonetheless pay attention and put it in your bag of tricks. There may come a time when you'll find it useful and you'll be glad you did. I’ve taught photography to individuals, large workshops and tours and every size in between. I’ve found the fastest way most people learn is by studying with an instructor one-on-one or in a small group where your teacher can closely watch what you’re doing, give you immediate feedback and responses. When that happens most people are amazed at how much progress they make in a short time. A good teacher can show you ways to shoot and edit your pictures. They can guide you through the myriad of camera and software options to the best ones and help you get comfortable using them. They can teach you what you may not know you need to know and answer your questions. Their positive feedback can build your confidence and their warnings can help keep you from making mistakes and developing bad habits. If you're not sure what to photograph give yourself an assignment or choose a subject you feel drawn to and keep taking pictures of it. Depicting it in different ways will help you learn to see and compose better and get you beyond taking obvious, cliche shots. Photographing Cathedral Rock is a passion project of mine that I started after I moved to Sedona in 2005. I gave myself the assignment to photograph it in as many ways as I could. I still love doing so. One of my favorite ways to depict it is reflected in water like I’ve done in my photo at the top of this photo tip. Another project I took on was learning astrophotography. We have spectacular star studded night skies in Sedona that I grew eager to capture. That was a big undertaking, which resulted in my learning a lot. It stretched me to find new ways to scout, shoot and edit that help pictures I take any time of day. I became more familiar with scouting apps like PhotoPills, which some call the Swiss army knife of photography. It and similar applications, like Photographer’s Ephemeris, provide useful information about where and when to shoot the Milky Way, sunsets, moonrises, eclipses and more. |
||||||||||||||||
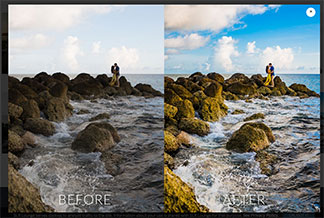 Before and after using a Lightroom preset. |
||||||||||||||||
|
Editing my night shots presented new challenges that deepened my appreciation of Lightroom presets and profiles. These are collections of adjustments that are bundled together, which can be applied to photos with one click. They work well on many subjects and can speed up your workflow. I often try them when I’m not liking what I’m seeing while editing and usually find I get more pleasing results.
There’s always more to learn about photography. A good way to find new things is to explore what’s in photo software updates. I discovered profiles in a Lightroom update. Updates usually contain new features. I look for ones that affect to the types of photography I teach and do because they’ve helped my students and I create better photos with more ease. |
||||||||||||||||
 |
||||||||||||||||
| Your camera and photo software are tools that translate your vision. The better you learn to use them the more eloquently you can express what you have to say as a photographer. It’s said that learning keep us young, so keep learning! |
||||||||||||||||
|
~~~~
Susie Reed's Sedona Photo Tours are ranked #2 on PhotographyTalk.com's list of the top photo workshops to attend in 2019. ~~~~ LEARNING TO SEE 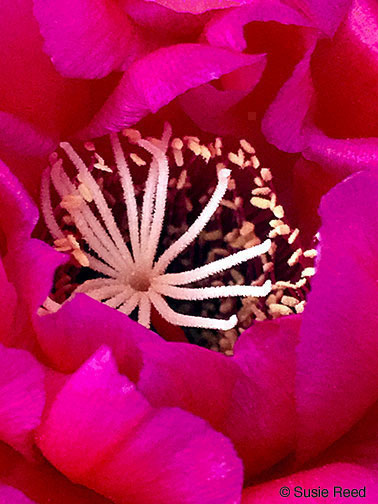 "Cactus Center" • iPhone Photograph by Susie Reed |
||||||||||||||||
| One benefit of doing photography is it helps us see better. Even when we don’t have a camera in hand our ability to observe is heightened. Our sense of sight gets more acute as we do photography. Similar to how deaf or blind people develop other heightened senses, we get better at seeing. Photographers tend to notice more and see things others miss in a world where we’re barraged with visuals. We have the ability to capture and share isolated moments that enable others to see and feel what we do. I’ve long made it my intention to share beauty through my photos in part because I know seeing beauty makes people feel better. I look more astutely when I have my camera with me and once I got my iPhone, which enables me to take pictures almost anywhere, I found my ability to see improved because I was looking for pictures more. I like the immediacy of my iPhone. Sometimes I prefer it to my big camera. It weighs next to nothing and I find it great for shooting panoramas and short videos of scenes that are too broad to capture in a single exposure. I also love shooting flowers with it. |
||||||||||||||||
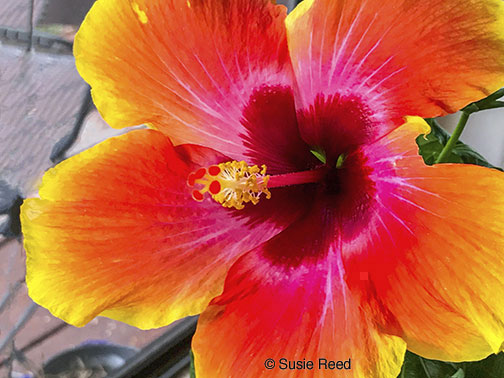 "Hibiscus Glow" • iPhone Photograph by Susie Reed |
||||||||||||||||
| I sometimes use my iPhone for scouting. I'm glad I have it when I find a new place to shoot that's worth going back to with my big camera when conditions are more favorable. There are camera phone apps let you capture large photo files (even raw) that you can improve with tools found within the app or by using other mobile apps like Photoshop and Lightroom. If you're good at doing post-processing with them you can create pictures that look just as good as ones taken with bigger cameras. On photo shoots usually we have an idea of what we want, but I also like to go out exploring with nothing specific in mind except to find good shots. I suggest trying this. It can help you learn to see better and discover things you might otherwise miss. Have you ever gone on a shoot with someone and later looked at their photos only to find they got some gems you didn’t see? Remember to look around a lot when you’re taking pictures. It’s easy to get fixated on getting shots you feel drawn to, which is great and something you should do, but there’s likely more good pictures to be found if you look further. When you think you're done, if you have time, search around for more shots. You may be happy you did. |
||||||||||||||||
|
TRY TRY AGAIN
 "Reflection Perfection" • Cathedral Rock • Sedona, AZ • Photograph by Susie Reed |
||||||||||||||||
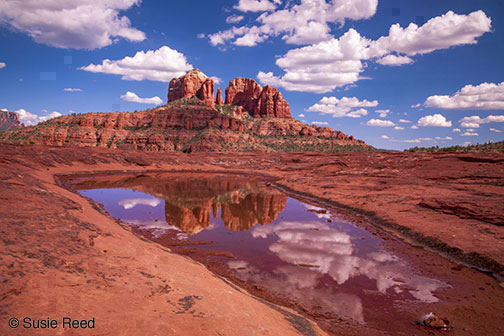
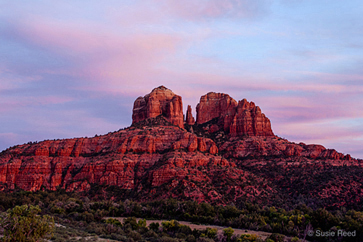
| The adage “Try, try, again.”, is good for photographers to follow both while shooting and in post-processing. Sometimes when we find something wonderful to shoot conditions aren’t optimal. If so try to go back and photograph it again or multiple times. Check out different times of day and seasons. It will never look exactly the same and you'll see it differently each time, especially if you make that your intention. If it's a landscape aim for when there's nice light and other interesting elements you can add like I did in my photo of Cathedral Rock above. Smartphone apps like Photographer’s Ephemeris, PlanIt! and PhotoPills can help you plan good times to go and spots to shoot from. Some subjects warrant revisiting, they're that good. I have a love affair going with Cathedral Rock, which I'm fortunate to see from my home in Sedona, AZ. I've photographed this iconic landmark year in and year out, with cactus flowers, covered in snow, reflected in water, with fall leaves, rainbows, the moon rising, the Milky Way, colorful sunsets and more. It's a subject I know well and never tire of. Photographing Cathedral Rock is passion project of mine, which began when I moved to Sedona in 2005. I gave myself an ongoing assignment to photograph it in as many ways as I could to show its beauty and share how I feel about this magnificent place. I've taken thousands of pictures and am still finding new ones that excite me. You can see some of my favorites on my website and Facebook pages. It can be easy to take cliche shots of often photographed places like Cathedral Rock. It’s challenging to take good new and different ones. You have to look harder, which is good because it helps you see more. Your best photo isn’t necessarily the first one you take nor the most obvious. Shoot a lot. Move around. See how different vantage points look through your lens. You're missing photo ops if you plant your tripod in one place and only shoot from there. Take advantage of applications like Photoshop and Lightroom to do post-processing. They can bring your photos to life and fix a number of picture problems. It's good to explore lots of camera and photo software settings. As you do you're bound to discover new ones you like that can be used to improve and fine tune other photos. I usually create a few versions of a photo in post-processing and if time permits, I'll look at it later with fresh eyes and sometimes adjust more. I've got to be mindful how far I take it though. I’m a perfectionist, which can be a blessing and a curse. It pushes me to make photos better, but sometimes I spend too much time trying to do so. I’ve had to learn to leave all enough alone. Sometimes it’s better to be done than perfect. |
||||||||||||||||
|
ANATOMY OF A SHOOT AND AD-LIBBING
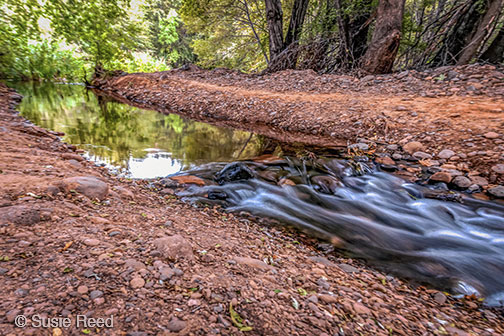 "Creekside" • Sedona, AZ • Photograph by Susie Reed |
||||||||||||||||
| I recently spent a fun afternoon hiking along Oak Creek in Sedona with my camera and our dog Danny who gleefully kept retrieving a ball. After about two hours of dog play I felt more than ready to take pictures. It was near sunset and the light was fading. I usually carry two tripods, a full size carbon fiber one and a small gorilla tripod, which is short, lightweight, compact and flexible. Like a gorilla it can wrap itself around tree limbs. It can be set up almost flat on the ground and in all sorts of positions. That day I only brought the gorilla tripod so my hands could be free for the dog. It’s small enough to fit in a side pocket in my pack where I sometimes carry water and only stands about a foot high, so I looked for shots I could take from down low. As I surveyed our surroundings I envisioned a photo and I knew where I could go to find the elements I wanted. This included a section of rushing creek, plus some still water with a reflection and trees and rocks along the edge of the shore. I wanted the flowing water in the creek to look silky and everything else to be as sharp as possible. To achieve this, I planned to take a long exposure with a small f-stop and have my camera on the tripod so it wouldn’t move while the lens was open. If it did, my whole picture would come out blurry instead of just the section I wanted. When I went to set up I discovered, much to my dismay, that a part I needed to attach my camera to the tripod was in my other tripod’s carrying case at my studio. Urgh!! I felt discouraged, but wasn’t going to be deterred. I was hankering to take pictures. I had to come up with another plan... I could have raised my ISO up high to get a faster shutter speed and shoot hand held, but I doubted I could stand still long enough to get a sharp picture and I was concerned if I did so it would add noise to my photos and makes them grainy, which I didn’t want. So rather than to try to keep still, I decided to embrace movement. I twirled around while taking long exposures and created abstract images with lines, swirls, stripes and colors. I got some surprisingly good results, especially considering I’d never tried this before. |
||||||||||||||||
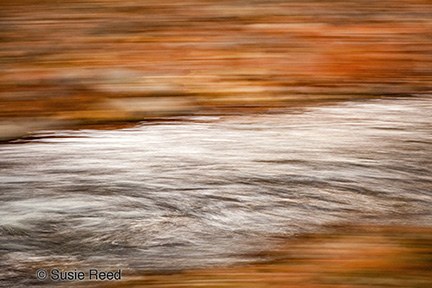 "Swirls and Twirls" • Sedona, AZ • Photograph by Susie Reed |
||||||||||||||||
| But this did not satisfy me. I still wanted to get the shot I’d visualized, which was there before me, nicely light, so I turned myself into a human tripod. I sat on the ground with my knees up, rested my arms on top of them to steady myself and held my breath as I took pictures. I sort of looked like I was doing photo yoga. I held this pose and my breath as I fine tuned shots by adjusting my camera settings and composition. I ended up getting some good pictures so I’m glad I tried. Luckily I’m small and flexible and like my gorilla tripod I can fold up into some compact positions to take photos. |
||||||||||||||||
|
SEIZE THE MOMENT
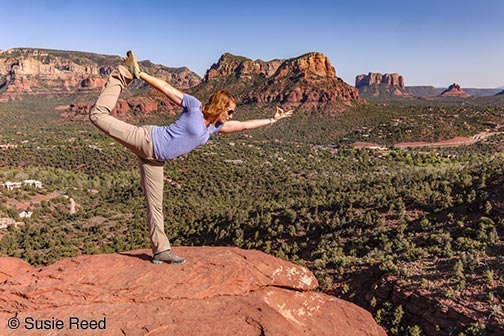 "Flying High" • Sedona, AZ • Photograph by Susie Reed |
||||||||||||||||
| Some shots come along once in a lifetime, like when my friend spontaneously struck this yoga pose while we were out exploring Sedona. Perched up on this high ledge, she looked like a bird soaring above the elegant landscape. Luckily I had my camera in hand. Rarified moments like this are why you want to know how to take pictures quickly with any camera you may carry, be it a DSLR, smartphone or anything else. You never know when magic may happen or when you’ll come across a beautiful rainbow, moonrise or sunset. You don’t want to miss a great shot because you’re fumbling around. To keep this from happening, get familiar enough with your camera and other gear like your tripod so you can use them quickly. We learn by practicing. If you practice enough eventually operating your camera will become second nature. You’ll be able to use it on autopilot, but there’s a learning curve you need to go through. Since cameras have so many options trying to figure them out can feel daunting, intimidating and overwhelming, but it’s easier than you may think. There are a number of ways to get help learning photography. Read manuals, watch videos or if you really want to speed up the process find a teacher who can answer your questions and show you how to use your camera and some photo applications. You limit yourself and the quality of your work if you only use auto settings. Don’t be afraid to dive into the deep end. Explore different camera settings and ways to do post-processing with applications like Photoshop. By taking advantage of what these tools do, you can really improve your photos. One more tip, consistently store items in the same place in your camera bag so you don’t loose precious time hunting for something you need when you want to take a quick shot. Otherwise all you may end up with is a missed opportunity. |
||||||||||||||||
|
HOW TO DEVELOP A PHOTOGRAPHER'S EYE
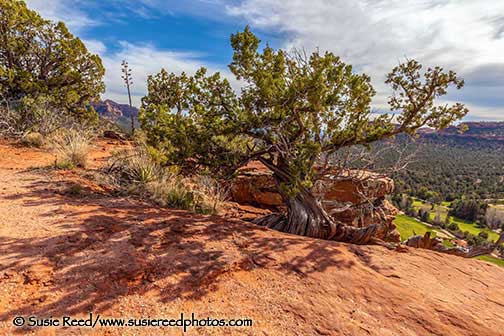 "Twisty Tree" • Near Sedona, AZ • Photograph by Susie Reed |
||||||||||||||||
| One characteristic that distinguishes photographers from one another is their photographer's eye, their unique way of seeing. When you pair seeing well with a passion for photography and/or for your subject, it's like adding a special sauce to a dish that only you can create, because you are the magic ingredient. If you try different photographic techniques eventually you’ll find ones you like, that suit you and enable your personal form of self-expression to come through. Even if you shoot different subjects, a consistency in your style will emerge. Emulating the work of photographers whose pictures you admire can be helpful and inspiring, but you need to go beyond imitating them to find your own originality and unique vision. You need to do more than stand behind another photographer who seems to know what they’re doing and essentially take their shot or anxiously hover behind them trying to get them to move. Many photographers find that disruptive and irritating. Seeing well takes time and concentration, as does trying different camera settings and making adjustments to composition, which are ways to improve photos. If there's a photographer where you'd like to stand, be patient while they fine tuning their shot. They'll eventually move. While you're waiting, look around. There are always multiple places to shoot from. In fact, looking elsewhere can help stretch your imagination and develop your photographer’s eye and you may even discover a better shot. Photographers who work at their craft enough develop a heightened ability to see that effects how they view everything. In the process of visually studying subjects, determining how to frame them and when to press the shutter, photographers enhance their sense of sight. The impact of this does not limited itself to photography. Whether they have their camera in hand or not, they come to view the world more astutely. A Peruvian shaman once told me that I enter into an altered state when I photograph. I found that an interesting observation, which never occurred to me. It made me realize I do go into what I'd describe as a meditative state of hyper-seeing. I intensely focus my attention on what I'm looking at and block out as much of everything else as possible. I encourage my photography students to have as few distractions between them and their subject as they can. Sometimes people get so busy fiddling with their cameras they miss what's in from of them... Don't let your camera become your biggest distraction. It's good to learn how to operate it so well it becomes second nature. This gives you less to have to think about and enables you to place more attention on observing what you're photographing. Sometimes people have misconceptions about what photographers do and what goes into making good photos. They may equate the quality of someone's work with the cost of their gear. The more expensive camera the better the photo..." Or they may say something like "You have an expensive camera. You must take great photos." Neither is necessarily true... Taking good photos has more to do with the person behind the camera than their equipment. You can take good photos and improve your photographer's eye with any type and size of camera because seeing well comes from you, not what you're holding in your hands. Bigger and better cameras don’t make pictures better. Photographers do. |
||||||||||||||||
|
“It is an illusion that photos are made with the camera…
they are made with the eye, heart and head.” Photographer, Henri Cartier-Bresson |
||||||||||||||||
|
~~~~
Learn about Susie Reed's Private Sedona Photo • Archaeology • Scenic Tours Photography • Photoshop • Lightroom Workshops Portfolio Reviews and more. ~~~~ |
||||||||||||||||
|
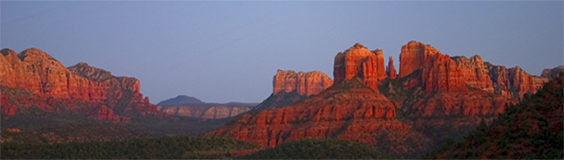
SHOOT FROM THE HEART
 "Sunset's Last Light" • Cathedral Rock • Sedona, AZ • Photograph by Susie Reed |
||||||||||||||||
| One piece of advise about taking good photos that's not often talked about is to shoot with your camera and your heart. When you bring emotions into the mix it can add depth and richness to photographs, so it’s beneficial to focus on your feelings as well as your subject. We need our brains to figure out how cameras and photo apps work. If we keep practicing and learn enough eventually using these tools become second nature. Then it can be easier to observe and express our emotions since less of our attention is needed elsewhere. There are a lot of elements that make photographs work such as good composition and rendering of colors, tones, contrast, sharpness, etc. When you include emotional expression, it's like adding your own unique secret sauce. Some photographs can even elicit tactile responses. Have you ever looked at a landscape photo and felt the crispness in the fall air or the warmth of the summer sun? These are the types of sensations pictures can evoke. By expressing our feelings through an image we offer the viewer an opportunity to relive our experience. I've read and heard that the brain responds the same to seeing a photograph of a place as it does to being there... That's why beautiful pictures can make us feel better. It's part of the magic and power of art. The first time I look at photos on my computer after I take them I can instantly tell which have the potential to express what I felt. Then I carefully choose the best ones to post process and enjoy watching the magic unfold as I use Photoshop and Lightroom to adjust them in ways that bring forth emotional responses. Sometimes students and photographers ask me how they can take their photography to the next level. Bringing your heart into the matter is one way to accomplish this. |
||||||||||||||||
|
"Photography is a way of telling what you feel about what you see."
Ansel Adams |
||||||||||||||||
|
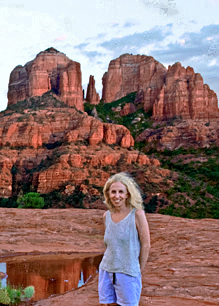
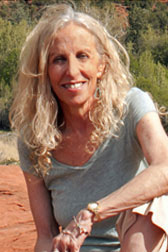
SUBTLE CHANGES
 Photo of Susie Reed at Cathedral Rock by Kevin Charbonneau |
||||||||||||||||
| Sometimes subtle changes photographers make or watch for make a big difference. I like spending plenty of time in places where I photograph landscapes because as the light changes or the sun moves in and out of clouds you can get dramatically different shots in a matter of moments. Some of my favorite spots, like Cathedral Rock in Sedona, Arizona, I visit again and again to shoot from different vantage points, times of day and seasons. You can deepen your insights and relationship with the places you shoot, just like with people, by spending time with them. As you do, it can lead to some great discoveries and photos. The variety of pictures I've taken at Cathedral Rock is amazing, not to mention, it's a wonderful place where I love to spend time. Rather than getting bored or tired of being there, I always go filled with a sense of wonder and excitement about what I'll find and leave with something new, feeling happy and grateful I went. Subtle changes made to camera settings and with software can really effect how a photo looks. By over or under exposing, for example, you may bring out details and tones otherwise lost. Apps like Photoshop and Lightroom even allow you change your exposure after the fact as well as offer an array of other options to enhance photos. When I teach Photoshop, especially to beginners, I often find there's a jaw dropping moment when people see how fast and easy it is to improve pictures by just using the levels tool to adjust shadows, highlights and mid-tones. Other tools I'm fond of are clarity, which sharpens and vibrance, which brings up muted colors while leaving other colors that appear fine alone. You can also make slight adjustments and dramatically alter a photo, like increasing or decreasing contrast a little. If you shoot raw files, they are as the name implies. They need to be cooked, so to speak, in post processing. When you first open them, your photos may appear muddy and in need of sharpening, but the data to easily do that and much more is there. If you know which tools to use, you can create stunning photos from ones that may not initially look so good and ones that do look good can be made even better. Some photographers say they don't want to bother with post processing, that their pictures look fine as shot. What some fail to realize is how much better their photos could be with just a few tweaks. As a photography teacher, I've worked with lots of people who feel overwhelmed at the prospect of learning Photoshop and Lightroom or what their cameras can do. That's understandable, considering they present us with so many options. The good news is, you don't need to learn everything. Just knowing how and when to use some of their best features can make a big difference. |
||||||||||||||||
|
WHEN LESS IS MORE
 |
||||||||||||||||
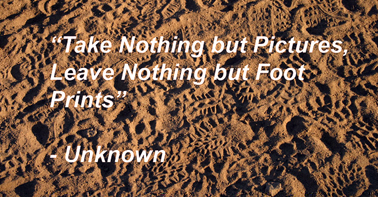
| Sometimes in photography less is more. For example, as the saying goes, “Take nothing but pictures. Leave nothing but footprints." When editing, don’t be redundant. If you have a few pictures of the same subject that are good, pick the best one and show only that. Similar images are unnecessary and lessen the impact of what you’re presenting. You risk people getting bored and losing their attention before they see everything you want. Smaller aperture settings create a greater depth of field, but they require longer exposures, as do low light conditions. If your lens is light and you're taking pictures at shutter speeds of 1/30 second or slower, use a tripod if possible, to keep from getting blurry pictures caused by camera shake. You can also help prevent this by increasing the ISO, but a word of caution about doing so... Higher ISOs can create noise (grain) in photos as well as reduce sharpness and contrast. Lower ISOs and longer shutter speeds produce richer colors and more well defined edges. Post processing done well can improve photos by correcting conditions our eyes can adapt to see, but cameras can’t capture. If you're using applications like Photoshop and Lightroom, be careful not to over do it. Watch out for colors that are too garish, pixelated images caused by over sharpening and halos around subjects in HDR photos. These are signs you’ve gone to far. You don’t want your pictures to look “Photoshopped” or like they’re HRD. Photos should be about the subject, not the process. |
||||||||||||||||
|
WAYS TO BE INSPIRED
 "Play Me A Song" • Photo by Susie Reed Rock Art near Sedona, AZ |
||||||||||||||||
| There are many ways photographers can be inspired. To follow are a few to consider... Go photograph a place you’ve always wanted to. Take pictures of people and places you love. Shoot for the sky. Let clouds, stormy weather and beautiful sunsets create dramatic backdrops for landscapes. Go out and take photos during the “golden hour”, around sunrise or sunset, when the best light is often found. Seek out new places to shoot. Look for different ways and angles to photograph places you’ve shot before. Look at the work of photographers you admire. Go to talks by photographers. Take in their words and pictures. Read photo books and magazines. Visit galleries that show photography. Enter reputable photo contests or submit your work to a gallery. Even if you don’t succeed it will motivate you to create better photos and finish some work. Take classes. Get your photos or portfolio critiqued by an experienced photographer who can point out your strengths and ways you can improve. Join a camera club. Talk shop with other photographers. Share your favorite tools and techniques. Buy new equipment or rent gear you can’t afford or haven’t used before. Read your camera and software manuals. When you learn new post processing tools try them out on old photos. See how much better you can make them. Share your work with others who enjoy it and support you. Stay away from naysayers. Look at photos you took in the past. See how far you’ve come and discover gems you may not have noticed in prior edits. Go out on a shoot with an expert. Be in nature. Surround yourself with beauty. When you feel the urge to go photograph some place, do so. Follow your photographer’s intuition. Follow your passion. Let your love of photography fuel your work. |
||||||||||||||||
|
WHAT YOU SEE IS WHAT YOU GET
 "Sunset Glow" • Cathedral Rock • Sedona, AZ Photograph by Susie Reed |
||||||||||||||||
| I'm lucky to live in Sedona, AZ where I love to take pictures of Cathedral Rock, which is one of the most photographed places in Arizona. That being the case, it’s hard not to take cliché shots others haven’t already captured time and again. When I moved here I made it my mission to photograph this beautiful location in ways that were splendid and different. To create pictures which had an extra something like the full moon above it, a magnificent sunset sky behind it, the rock formations reflected in water, surrounded by glorious fall foliage or a shimmering rainbow. (That one took a while..) To successfully take such photos has required many visits, searching for different angles, wonderful light, clouds, turning leaves, persistence and being in the right place at the right time. When we photograph the same place over and over again it can stretch us to see better and discover elements we might not have noticed before. There are rewards to be had. I continue to search for ways to shoot Cathedral Rock distinct from how I’ve done so before and still enjoy the process. I’ve judged numerous photo contests in Sedona. Without fail people submit pictures of Cathedral Rock. To give you a judge’s insider's perspective... after a while some of the people on the selection committee inevitably begin to sigh with displeasure as we see one redundant picture after another. Most Cathedral Rock photo entries show us nothing new, exciting or unusual and often the colors are overblown. We are looking for photos that wow us. Once an exasperated judge exclaimed like a mafia hit man, “If I see one more picture of Cathedral Rock…” Others at the table nodded their heads in agreement. Then a quintessential shot of the location came up. We couldn’t deny it was a winner and indeed we awarded it first prize at one Sedona Photofest competition. It may have been easier to win with another subject not so often photographed as Cathedral Rock, but there were so many parts of that entry that worked in concert it justified our decision. It can be a good exercise for a photographer to shoot the same place over and over, to seek out ways to make it look unique and different. It can help you fine tune and improve how well you see, adjust your camera, plan your outings and develop to your photographer’s intuition so you get to the right place at the right time and take a good exposure. That coupled with sensitive post processing can bring your photograph alive and transport the viewer to where you were. |
||||||||||||||||
|
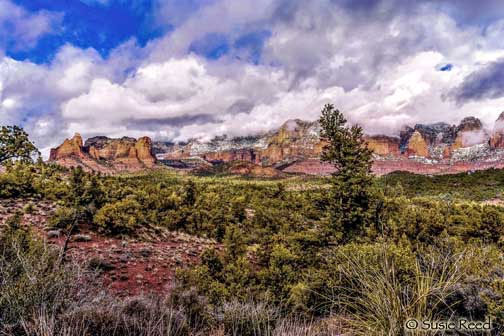
COLD AND RAINY WEATHER PHOTO TIPS
 "Snowy Sedona" • Photo by Susie Reed |
||||||||||||||||
| Landscape photographers are drawn outdoors to take pictures, regardless of the season. In fact stormy weather can produce dramatic skies and beautiful snow cover, which photographers find hard to resist, but cold, wet conditions pose some challenges. To deal with them here are a few tips to bear in mind. Do your best to keep warm and dry. You’re able to focus more fully on your subject and take better pictures when being cold and damp are not distracting you. Wear layers, insulated boots and a hat. Proper gloves are also important. It’s not easy to adjust camera settings and push the shutter with heavy gloves on. I suggest wearing gloves with no fingertips or ones that have tips, which can be folded back. Good gripping glove liners also work well. I also recommend bringing a thermos filled with hot soup or cider to warm you up. Try to void alcohol and coffee because they make you less able to maintain body warmth. Protect your gear from moisture. Heavy-duty, waterproof vinyl pouches are available from Ewa-Marine. Though their bags are designed for snorkelers, they can be used for cameras in any wet situation. They have a clear optical glass filter you position your camera lens to see through. Less elegant and inexpensive, yet still effective, are Ziploc or garbage bags, big enough to protect long lenses. I once used a Ziplock bag to protect my Nikon while I took pictures in torrential rain from the sidelines at a San Francisco 49ers football game. I choose this means after it was suggested to me when I contacted every camera store in town trying to find a protective camera cover without success. Not wanting to miss this special photo op, I gave their suggestion a try. My camera was fine and the shoot memorable. The person from the team who arranged it informed me in advance that Steve Young never goes over to photographers. Yet when the illustrious quarterback came out on the field he walked right over to me. I must have been a sight as I stood there dripping wet, stylishly dolled up in my hooded yellow rain slickers with my camera poking out of a plastic bag... An additional way photographers can use a plastic bag is to put your gear inside one while changing lenses in moist weather. This will keep the insides of your equipment dry. It’s also recommended you put your camera in a plastic bag before coming indoors after a cold shoot because when it gets into a warmer environment, water molecules can condense on metal surfaces of cameras and lenses. If this occurs too often it can cause corrosion and mold to grow. To avoid these potential problems, put your cold camera in a plastic bag before going inside. Then place it in the coldest spot you can find so it can warm up slowly. As it gets to room temperature the moisture dissipates and gathers on the sides of the bag instead of on your camera. Lastly, when taking pictures in cold weather, especially below-freezing temperatures, it’s important to have fully charged batteries with you, since cold conditions can quickly drain batteries. If possible keep a spare battery on you in a warn spot like your jacket pocket. If one battery gets low switch it with the warm one. Then put the drained battery in the same warm place. This may extend its use time since charged batteries quickly recover when warmed. |
||||||||||||||||
|
PHOTOGRAPHER'S INTUITION... RETURN AGAIN
 |
||||||||||||||||
| I live in Sedona, Arizona where beautiful photo ops abound. Nonetheless, with many stunning locations to choose from, I often find myself returning over and over again to a few of my favorite spots. I’ve grown to know these places intimately and have documented them extensively. I never tire of them nor find them the same twice. I keep being surprised and always make new, rewarding discoveries. Places we feel drawn to as photographers speak to us and the more we go the more they reveal their secrets, which we can share in our pictures. A photographer’s intuition is a valuable tool, one that’s not often discussed or taught, but it's an asset that should be developed and responded to. When we feel drawn someplace at certain times, based on my experience, there’s good reason. We don’t know why until we get there... I’m always grateful for the times I’ve followed my intuitive voice. The rewards have been tremendous and the proof is evident in my photos. Recently, I photographed the same location two days in a row. The first shoot was great, but the next day was far better! On the second day my little voice said, “Go again.” So off I went with a couple from New York. As we spent the late afternoon taking pictures until after sunset the sky filled with rainbows, fabulous monsoon clouds and a big moonrise, all nestled in a beautiful landscape with reflecting pools mirroring the wonderful sights. A shoot doesn’t get much better than that. I’m so glad I followed my intuition. A great time was had by all. |
||||||||||||||||
|
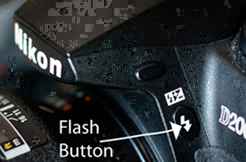
ADD LIGHT WITH FILL FLASH
 |
||||||||||||||||
| Lighting is very important in photography, but sometimes because of where one needs to stand while taking a picture, lighting conditions can be a challenge, such as when a scene is backlit. When that’s the case the background of a photo may come out looking fine, while the main subject, in the foreground, is too dark or in shadow. To help overcome this problem manually turn on your flash and use what’s called “fill flash” to lighten the foreground and brighten dark shadow areas natural light can’t get to. Using this setting can make the difference between capturing a good photo or not. It can also reduce unflattering facial shadows caused by overhead lights. Most cameras, even point and shoot ones, have a fill flash mode, which allows the flash to fire no matter the lighting conditions. Check your manual to see how to turn it on and what other options, like red eye reduction, your flash may have. Many cameras will allow you to reduce or increase a flash’s output, which enables you to fine-tune how much light it emits to best suit various lighting conditions. To determine how changing flash settings are affecting your photos try shooting the same scene at different settings to see what looks best. |
||||||||||||||||
|
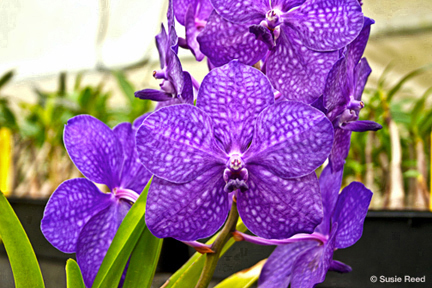
KEEP IT SHARP - FOCUS ON FOCUSING
 "Voluptuous Vandas" • Photo by Susie Reed |
||||||||||||||||
|
Most photographers have experienced the disappointment of enlarging what looks to be a great picture only to find it’s out of focus... Lack of sharpness is one of the main reasons photos fail. Fortunately some software programs, like Photoshop and Lightroom, offer tools that can sharpen slightly out of focus photos. Just a word of caution... don’t over correct and make pictures look pixilated.
The best way to get sharp photos is to make sure pictures are in focus when you take them. Autofocus does not always focus where we want. This can be especially true for close up photography. If you’re having that problem switch your camera lens to manual focus. Also try focus stacking. Camera movement is another big culprit. In low light conditions you can reduce this by using fast shutter speeds and higher ISO settings. Though a higher ISO may cause noise, which can make pictures to look grainy, it’s better than having them out of focus. Using a tripod is one of the best ways to get sharp pictures, no matter the shutter speed and ISO. When shooting with a tripod it’s good to use a cable release or the self-timer, so you don’t create movement when you press the shutter. When shooting with a telephoto lens or zooming in on subjects, sharpness can also be a challenge because you’re magnifying not only your subject, but also camera movement. In these situations try to use shutter speeds as fast as 1/500 or 1/1000 a second and/or shoot from a tripod since longer, heavier lenses are harder to hold steady. If you’re shooting hand held, to help avoid movement, brace the camera by bringing your elbows into you sides, holding it with two hands and gently pressing the shutter. These steps taken alone or in combination can help translate your vision into beautiful sharp photos. |
||||||||||||||||
|
CREATIVE CHOICES - DEVELOPING YOUR UNIQUE EYE
 "Earth Womb" • Photograph by Susie Reed |
||||||||||||||||
| The act of creation requires doing. It may start with the seed of an inspiring thought that when acted upon brings ideas to form. Taking action is crucial. It’s been said if you want to get to Carnegie Hall, “Practice, practice, practice.” The same principal can apply to becoming a good photographer. The more photographers shoot, study their craft, learn their tools, get feedback, meet real or self imposed deadlines and stretch themselves by raising the bar the better they can become at seeing and creating good pictures. If as a photographer you want to ultimately develop your own unique eye it requires putting together the ingredients of the picture making process in ways that are solely yours. It’s similar to how an experienced chef uses his tools and combines foods in new and different ways to come up with recipes. It’s not cookware that makes good food. It’s the chef. With enough knowledge, trial and error, experimentation and persistence chefs develop their pallets and the confidence of knowing they can create something new and delicious. Photographers can use those same kinds of tactics to develop their unique eye and ways of expressing their vision. Camera gear and software are tools that facilitate this process, but it’s a photographer’s choices and actions that create good pictures. When someone looks at a photo and says, “Wow!” it’s kind of like when someone tastes food and says, “Yum.” It builds confidence in the person who made it, which is a foundation for creativity. |
||||||||||||||||
|
LET THE PICTURE TAKE YOU
 "Paradise" • Photograph by Susie Reed |
||||||||||||||||
|
One of my favorite experiences as a photographer is when I’m so captivated by what I’m seeing that pictures seem to take themselves. I find myself moved to places where what I see through the lens looks and feels just right, inside and out. There’s no questioning, “Should I take this shot?” Instead there’s a knowing, a certainty. The light is so beautiful or what I’ve discovered is so amazing that nothing else is in my head and heart but what I'm seeing.
Being solely focused on what one is photographing in this way is a wonderfully creative place to be and an enriching experience. These moments don't occur when we’re fiddling with our camera or our attention is divided in some manner. When something totally captivates us there’s no seeing anything else, just the wonder and depth of what’s before us. With camera in hand we can capture and interpret this and through our pictures give others the opportunity to view and feel what we did. Such is the power and magic of photography. |
||||||||||||||||
|
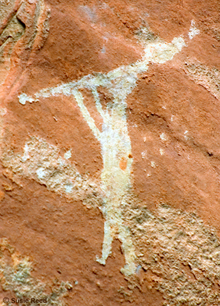
INSTINCTS AND PERFECT TIMING
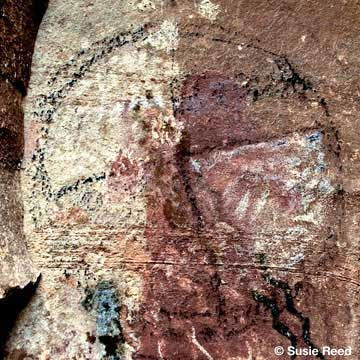 "Four Directions" • Rock art near Sedona, AZ Photograph by Susie Reed |
||||||||||||||||
| For photographer’s listening to and following your instincts is a wonderful skill to develop. Have you ever noticed how when you do amazing things tend to happen? Though following your instincts is not something usually mentioned in camera manuals and how to books, it’s an important asset to use because it can lead to such fruitful results. How do you recognize when your instincts are speaking to you and distinguish its messages from other thoughts and feelings? For me, there’s usually a certain quality of deep knowing that comes along with instinctual feelings, which over time, I’ve learned the benefits of following and the perils of not... When it comes to my photography sometimes I have what I call a “little voice” inside that occasionally urges me to go take pictures at certain places and/or at particualr times. Sometimes that voice isn’t so little. Every once in a while it becomes a redundant, demanding broadcast running through my head. Such was the case recently. On the last winter solstice I kept feeling I should photograph a rock art site I’ve been documenting for years. When the day came things kept happening that delayed me from getting there when I planned. Nonetheless, I persisted in going due in large part to my little voice’s insistence. As one delay after another occurred, I just kept saying to myself, I’ll get there when the time is right. Shortly after I arrived at the site I made an important, new discovery. I observed a rock art solstice marker, which had I gotten there earlier when the shadow and light were different I would not have noticed! So my timing turned out to be perfect. I’m so grateful I trusted and persisted in following my little voice. It led me to an amazing, exhilarating, special find. My students and other photographers often ask what to do to take their pictures to the next level and beyond. Following your instincts, hearts callings and creative urges can help. In my case they got me to the right place at the right time. So I encourage you, if you feel drawn to go somewhere try to go. Persist, even if it takes a long time or your journey unfolds differently than planned. Chances you're being pulled there for a reason and you won’t know what that is until you get there where only you can capture what you discover with your own unique way of seeing. |
||||||||||||||||
|
WHAT PHOTOGRAPHERS CAPTURE
 "Peppers on Table" • Photograph by Susie Reed |
||||||||||||||||
| When I was a freshman in college I was fortunate to go on World Campus Afloat where we had an opportunity to meet some of the Maasai tribe in Africa. These were stunning people whose colorful native garb and ornate beaded jewelry would make any photographer grab their camera. However, we were asked not to take their picture because the Maasai believed having their picture taken captured a piece of their soul. That notion made a big impression on me and influenced my photography from then on. I’m not sure I believe that’s true nor do I think I have the power to do such a thing with my camera, but it left me with a respect for my subject greater than I’d had before. I do try to capture the essence of my subjects in my photos, but not literally. I strive to create photos that allow others to feel and see what I did in the moment when I pressed the shutter as if they were there too. I want the viewer to get so lost in my picture that all they experience is the subject. People often tell me my fruit and vegetable pictures make their mouths water or they can smell the flowers in my photos. When I edit a shoot from the Farmer’s Market and salivate over a picture I know I have a winner. Such responses got me wondering how these types of physical reactions get triggered. I did some research and found that the mind experiences what we are seeing, whether it’s literally there before us or not. So perhaps that picture of a beautiful rose we seem to smell harkens us back to when we first experienced smelling roses in our family’s garden when our neural pathways, which dictate how information travels through the nervous system, were being developed. So what photographers capture is more than meets the eye... |
||||||||||||||||
|
STEPS TO GOOD PHOTOGRAPHY
 "Clouds Gathering" • Cathedral Rock • Sedona, AZ • Photograph by Susie Reed |
||||||||||||||||
| Creating good pictures involves many steps. Some are simple while others require deeper knowledge and practice to master. One of the most important steps is when you press the shutter, because it is around that moment which everything else revolves. Before a shoot make sure you have the proper gear, camera cards and charged batteries. During a shoot minimize distractions as much as possible – focus solely on your subject. On the back end, much can be achieved through good editing and knowing how to effectively use software and printing processes. When combined and done well these steps lead to great pictures. |
||||||||||||||||
|
SHOOT A LOT SHOW A LITTLE
 "Lively Layers" • Photograph by Susie Reed |
||||||||||||||||
| This applies to just about any subject you may photograph. By taking a lot of photos you give yourself numerous options to choose from when editing a shoot, but use discretion when it comes to how many pictures you show people. Base your choices on who your audience is. Grandma and Grandpa my love looking at thirty pictures of their new grandchild, but for your friends four baby photos might be enough... When you show people too many photos they loose their interest in what they’re seeing and it diminishes the strength of you best images. Selectively choose your strongest photos. They will speak volumes. A photographer’s work is often solitary, done alone behind our cameras or in front of our computers... Expanding the sphere of our work can be beneficial. By sharing our photos we can learn what they communicate, which can be illuminating and insightful. By looking at others’ pictures we can see, among other things, how well photography can be done, which can be motivating and inspirational. When I studied at San Francisco Art Institute I loved our photo critiques. We’d put up pictures and lively, enriching discussions would ensue. A lot of fine-tuning, inspiration and respect for others’ talents came from those gatherings. Today I lead photo critiques where I enjoy watching people leave with new ideas and a greater appreciation and understanding of their work. When I teach I continue to learn, which helps me grow and stay fresh as a photographer. It’s great to see my students light up when they “get” something new, resolve a problem or become excited on a photo shoot. Their responses are reflections of experiences I still have myself, even after decades of taking pictures. No matter what level we’re at, we can still learn and discover more. That’s part of what’s so great about being a photographer. I had teachers who influenced me greatly by showing me the work of several legendary photographers including Ansel Adams, Edward Steichen, Imogen Cunningham and Edward Weston, to name a few. Their pictures helped me understand that photography is truly an art form when done right. Today I know outstanding contemporary masters like Jack Dykinga and have photographer friends on Facebook who continue to remind me of how artfully photography can be done. With regard to the benefits of sharing one’s photos, I have to say one of the best things I’ve found about exhibiting and having my work published is hearing what others say about my pictures. They’ve helped me see my photos in a new ways. Some point out elements I hadn’t noticed or provide new interpretations. It’s especially interesting to learn how people I don’t know respond to my photos. Others’ comments enable me to see when my intentions are coming through, which without their responses I wouldn’t necessarily know. I find that valuable feedback as an artist and communicator. |
||||||||||||||||
|
GETTING UP CLOSE
 "Cactus Points" • Photograph by Susie Reed |
||||||||||||||||
| Today’s camera’s sophisticated features go a long way towards helping create beautiful images, but they can’t think and see for us. Sometimes camera functions, such as autofocus, are better left turned off. Autofocus works well in most situations, but it can be problematic with close up photography. This is because with short depths of field often used at close range, camera sensors randomly select one of many focal points, which may not be the one you want. For example, you’re trying to zero in on a beautiful flower and the camera focuses on the leaves behind it instead... This can be frustrating and sometimes something photographers don’t even notice until they see their pictures after a shoot, when it’s too late to do anything about it. To get around this problem, if your camera will allow, set your lens to manual when doing close up photography. Then focus the lens yourself by turning it and/or moving a bit closer or further away from your subject until it’s sharp in the way you want. After you’re done remember to set your lens back to autofocus so you don’t inadvertently go on shooting thinking the lens is focusing for you when it’s not. To find out how to turn the autofocus feature on and off for your camera, consult your manual. |
||||||||||||||||
|
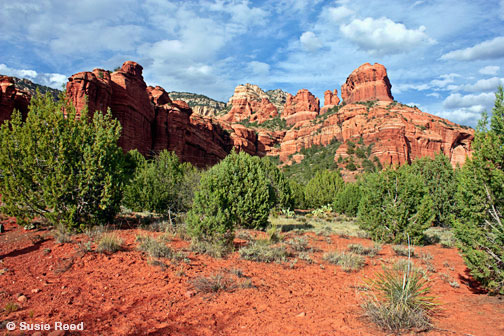
AIM FOR THE SKY
 "Snow Dusting" • Sedona, AZ • Photograph by Susie Reed |
||||||||||||||||
| I'm lucky to live in beautiful Sedona, AZ where we have spectacular red rock landscapes, wonderful clouds and amazing sunsets. I sometimes think of Sedona as a photographer’s paradise. There's no end to finding great places to photograph. Throughout the seasons and at different times of day the light is ever changing, creating a variety of conditions in which to shoot our beautiful surroundings. I have a lot of photographer friends who live in Sedona as well. Many of us have taken pictures the same places over and over again. That being the case, the challenge becomes how to get a better shot of the same location or how to create a picture that hasn’t already been seen and taken repeatedly. As my students often ask, “How do I take it to the next level?” For outdoor landscape photography the answer is to shoot for the sky. What’s happening in the sky in the background is what can make a photo stand out and be unusual and unique. That can be the difference between a good photograph and a great one. So capture dramatic clouds before a storm, shoot rainbows and colorful sunsets. Such backdrops will take your photo to the next level and differentiate it from others. |
||||||||||||||||
|
WHAT TO BRING ON A SHOOT
 Moonrise at Cathedral Rock • Sedona, AZ • Photograph by Susie Reed |
||||||||||||||||
| One night while I was out photographing the full moon at Sedona’s famous Cathedral Rock I took so many long exposures I depleted two camera batteries I had with me. I wished I had another so I could shoot more, but since I was essentially out alone in the middle of nowhere I disappointedly resigned myself to the fact I was done for the night. During that long shoot I noticed two other photographers off in the distance. As I was about to pack up one of them, who’d been shooting across the creek from me, gingerly approached from behind. He courtesy asked if I’d mind if he took a few shots next to me. I told him I was about to leave because my camera batteries were dead. “What kind of battery do you need?” he inquired. I showed it to him. He opened his backpack and pulled out the exact battery I needed, which he gave me to use. That was serendipitous and amazing. Sometimes wishes do come true, but the fact of the matter is, considering my remote location, the odds of someone coming along with the battery I needed were slim at best. I try not to get caught without something I need at a shoot as happened that night. To prevent this I bring certain things with me, which you might consider as well. These items aren’t very heavy and can easily fit in a camera bag or backpack. Exactly what I take with me varies depending upon the type of shoot I’m doing – if it’s inside or out, day or night. Sooner or later I’ve found I’ve needed or wished I had with me all the things described below. Some items aren’t camera gear. They’ve been added for comfort or safety reasons. It’s good to carry extras... extra camera cards, batteries, a filter, lens brush and lens cap. If you’re shooting film bring more than you think you’ll need. Thought, as I often say, you should get to know your camera well enough that operating it becomes second nature, it’s good to carry your camera manual with you in case you want look up how to set a particular adjustment or if you have a camera malfunction you want help resolving. It’s good to carry sunscreen, plenty of water or a beverage and some food like a power bar, sandwich or a snack. For long hikes it’s good carry a roll of toilet paper and some plastic bags to put used TP in so you leave nothing behind. It’s good to bring extra layers of cloths. Depending on the weather you may want to have a hat and/or gloves, sunglasses too. I also bring along a flashlight in case I’m out later than expected. I like hiking with a walking stick. Mine has a compass on top. It can also be used as a monopod. Sometimes I bring my tripod. It’s always nice to have a friend along who offers to carry it for you. I keep my cell phone with me. I’ve found even in some remote locations I can get a signal. If an emergency happens it’s good to have a cell phone. Some have GPS features that can be useful. When hiking it’s also good to carry a map, if not for you own use, for others you may meet along the way that need help with directions. To protect camera lenses keep filters on them. It’s much less expense to replace a filter than a lens. Carry a polarizing filter to use on bright, sunny days. Though I don’t always use all of the aforementioned items on a photo shoot, when I do need them I’m always grateful, happy and relieved to have them at hand. I’m more comfortable when I have some food, drink and the right cloths with me. Generally, the more comfortable I am the better my shoot goes. |
||||||||||||||||
|
STAY FOCUSED
|
||||||||||||||||
| Focus more attention on your subject than your camera. A big part of creating successful pictures has to do with how well you see what you’re shooting. When you pay more attention to your camera and its various settings than your subject you diminish your ability to engage with what or whom you're photographing. Become familiar enough with your equipment that operating it becomes second nature. Doing so will enable you to focus more fully on your subject and help you create better, more poignant pictures. |
||||||||||||||||
|
PHOTOGRAPHING PEOPLE
MAKE THEM FEEL COMFORTABLE 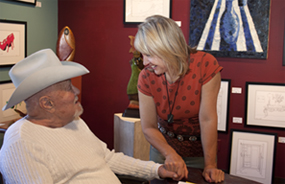 Tony Curtis and Linda Goldenstein at Goldenstein Gallery • Photo by Susie Reed |
||||||||||||||||
| Throughout my career I’ve photographed a wide array of people, one of my favorites being Walter Cronkite who I had the good fortune to photograph for the Common Wealth Club of San Francisco. I recently got to photograph actor and artist Tony Curtis at Goldenstein Gallery where we both exhibit in Sedona, AZ. Both Walter and Tony, with all their experience in front of a camera were perfectly comfortable having their picture taken, but many people are not. Some people haven't seen many good pictures of themselves so the prospect of being photographed makes them uneasy. When taking pictures of people try to make them feel as comfortable as possible and be quick. Don’t spend too much time fidgeting with your camera and looking at the LCD screen. The longer a person has to wait to be photographed the more uncomfortable they’re likely to become, which will show in photos. You’ll end up with pictures of people with forced smiles who look uneasy rather than getting spontaneous, flattering, natural looking, telling shots. If possible take a lot of pictures both posed and not. People tend to calm down after the first few shots. Sometimes what happens between poses is more interesting than what you’re setting up. Allow for spontaneity to occur; be ready to capture the unexpected. If you make taking someone’s picture a fun, comfortable experience it will be reflected in your photos. When I show people pictures I’ve taken of them they often say to me pleasantly surprised, “I look like that!” I enjoy showing people how good they can look, dispelling their notion they can’t take a good photo. |
||||||||||||||||
|
TAKE BEAUTIFUL PICTURES OF WHAT YOU LOVE
 "Fantastic Phalaenopsis" • Photo © by Susie Reed |
||||||||||||||||
| I love photographing beautiful subjects, especially flowers. I thoroughly enjoy immersing myself in discovering their unique presence, vibrancy, and beauty. The troubles of the world seem to fade away when I focus intently through the lens of my camera. I have the same experience when I look at my photos. So do others. People often breathe a sigh of relief when they see my beautiful pictures. They tell me it's like therapy. The photos calm and uplift them. Certain pictures makes us feel better. We react to images in many ways – mentally, emotionally, physically and spiritually. Bear this in mind when taking pictures. Strive to capture beauty. Art can be a great panacea for those who create it and those who view it. Photograph what you love. Take pictures of happy occasions and inspiring, beautiful places and subjects. You can experience them again and again through your photos. |
||||||||||||||||
|
SUCCESSFUL PHOTOS - FACTORS TO CONSIDER
 Cathedral Rock at Dusk • Sedona, AZ • Photograph by Susie Reed |
||||||||||||||||
| Many factors can contribute to a photo’s success. Here are some to bear in mind. Shoot interesting, appealing subjects that evoke feelings and inform. How subjects fit in the frame, composition and cropping make a big difference. Consider the final size picture you want when shooting so important information is not cropped out if the photo needs to be reduced to fit a particular finished size. The dimensions of an image a camera captures may not be the same as the final size needed. Lighting is very important. Make sure what you’re photographing is well illuminated. Use a flash to fill in light if necessary. If possible try to avoid harsh lighting situations with a lot of contrast.. Take colorful pictures. Beautiful colors add depth, vibrancy and richness to photos.. |
||||||||||||||||
|
TO GET GOOD PHOTOS - SEE WELL
|
||||||||||||||||
| One of the best ways to increase the chances of getting good quality photographs is to take a lot of pictures. Doing so provides more options when editing. It stretches the imagination and improves one's ability to see subjects well. Taking good photos is more than just point and shoot. Good timing, vision and instincts are crucial to a picture's success. Pay attention to every part of what’s in the frame, not just the main subject. Check the four corners and the background. Shoot from different angles and distances. Imagine seeing the photo in a picture frame. Ask if there's anything you could do to improve it. |
||||||||||||||||
 |
||||||||||||||||
| Award-winning photographer Susie Reed has extensive experience as a commercial and fine arts photographer. Her pictures have been in major museums and galleries as well as in numerous publications and on many products. She’s taught and spoken at the San Francisco Art Institute, California College of the Arts, the Sedona Arts Center, Sedona Photofest and elsewhere. In 2009 she joined acclaimed Goldenstein Gallery, which was voted the top gallery in Sedona for the last 11 years. |
||||||||||||||||
 Click on the links below to find out about private photography instruction and Sedona Tours with Susie.  Please share these photo tips with others. |
||||||||||||||||
|
|
||||||||||||||||